Yes, this is the 300th post on this blog which has to be some sort of milestone for me. The first post was on 17/8/2014 but then I waited until 19th December before making any further posts. To “celebrate” I’ve looked back and picked out five favourite moments from the last four years. I could have picked out far more, and these are not necessarily my favourites, but for what they are worth, and in no particular order …
Sadly, my darkroom adventure didn’t last too long due to domestic requirements. Fleeting as it was though I enjoyed my return to the analogue days and still harbour the hope of reinstalling a darkroom again in the future.
Zac – two years ago perhaps? Canon A1 35mm film camera. Scan from warm tone darkroom print
Universally panned by the folk at my camera club, this remains one of my favourite images partly because of the effort, not to say discomfort, involved in getting the image in the first place.
The Fuji X100 series are fabulous, pocketable, carry-everywhere cameras and I particularly enjoyed a day in the centre of Leeds armed with nothing more than a camera with a fixed lens and a few filters in my pocket.
Harsh light, strong contrasts and processing to match
December 2017 saw me coming towards the end of the 63 daily images challenge that was the prequel to this years 365. It wasn’t the first time I’d tried to take a picture a day but it was the first time I’d got anywhere near success so I was in buoyant mood.
I’ve just posted daily image 159 for the 2018 365-Challenge, which is my 222nd consecutive daily image since I started the image-a-day in October 2017. It is a few months since I reflected upon the project – indeed, its become so much a part of my every day that in some ways I no longer give it quite as much thought as I used to; it is indeed becoming part of my daily routine.
365-2018-158
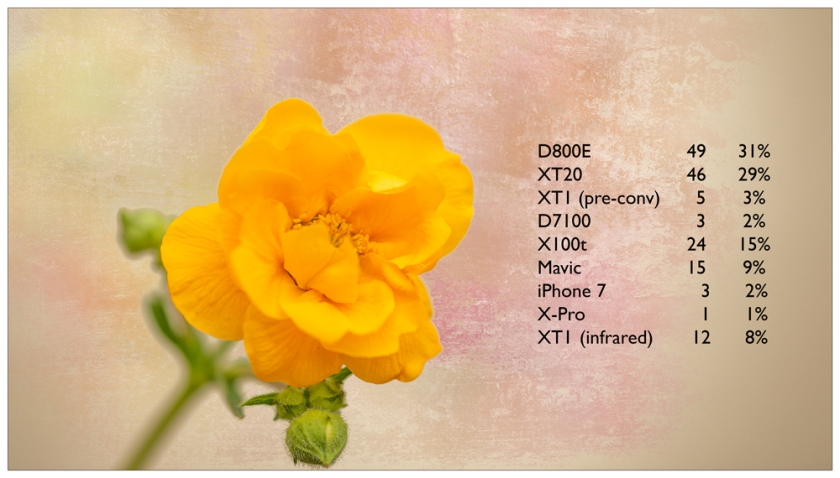
Beyond wondering if I could stick at it, one of the things I was interested in from the start was whether I would fall back upon my Fuji X100t or iPhone as my main camera of choice. I am fortunate enough to own several cameras and it seemed to me that taking a picture a day but still leaving the bulk of my kit unused was missing the point in some way. Whilst at the start of the process I was having to consciously make the effort to move out of my comfort zone of X100t in pocket when I left the house I am now finding that on the whole I am using the full range of cameras with a couple of notable exceptions.
There was a particularly prolific period of around six weeks in March/April when, temporarily freed from the tyrannies of pneumonia, I went out every day and I took several thousand images. Looking back, if I excluded the drone shots, all but around thirty of these were shot with one of my Fuji cameras. They are smaller, lighter and generally more convenient as I’ve commented before which was especially useful whilst still recovering. Noticing this, I made a conscious effort for a few days to use other cameras and so when I decided to go and visit the bluebells I deliberately chose the Nikon D800E. I have to confess I almost popped the Fuji bag into the car as well but was strong and went out with just the Nikon. I’ve not noticed any particular leanings since then and indeed apart from that instance my two key cameras (Fuji X-T20 and Nikon D800E) have largely shared the daily honours and between them account for 60% of my daily images year to date. Unsurprisingly, the X100t is in third spot whilst the drone, which I have actually used more than any camera other than the XT20, is in the number four position with 15 365 appearances. This is largely because I don’t want to overwhelm the 365 with drone imagery and also partly because a lot of my drone images have being trying out ideas and testing filters etcetera so fodder for my blog rather than the 365.
What is very pleasing is that I have only relied on the iPhone for 3 images. I am also very pleased to report that I have not as yet needed to resort to taking a picture of my lunch or coffee to fulfil the daily picture requirement. Many days I will take an image early on as a form of insurance but only once have I got to the end of the day and had to fall back on this for my 365. I am striving to make a meaningful image every day; something of which I am proud and happy to share rather than just a snap of something random for the sake of posting an image. Incidentally, around 85% of my daily images are also posted on the same day.
365-2018-139
Had the Challenge been to simply post one image a day regardless of when it was taken I do believe the split of subjects would be different. Looking at my Flickr photo-stream I have in the past had a general bias towards landscape, particularly mono. However, with the demands of the 365 this has changed and urban images now account for around a half of my recent postings and indeed 52% of my 365 images. That floral imagery is as prevalent as landscape (16% each in the 365) is not something I would have anticipated even given I do enjoy floral photography.
The good news in all this though is that I am a lot happier with my current urban work than with previous work in this genre. I am using my eyes more and seeing compositions that I would have missed in the past; 365-2018-142 is I think a case in point.
365-2018-142
True North (above): I’ve explored this location numerous times in the past and there are quite a few 365 images from the Dean Clough area. I think this is the first time though that I have pre-visualised to the extent that I knew I would want the telephoto lens though. The Fuji Velvia preset provided the proverbial icing. The colour/mono split has also taken me by surprise. 121 colour versus 38 mono images means that 76% of the 365 collection are in colour, something I did not see coming.
So, some interesting facts and figures (for my Inner Geek) but the most interesting thing I’ve noticed is how I no longer stress over the daily image. True, it’s one of the first things I think about when I get up in the morning but it’s in there amongst many other things that I need to get sorted that day. It’s definitely not a chore but it is something I need to tick of the to-do list each day in the same way I tick-off sweeping the hall or putting the washing on.
Finally, a couple of mosaics showing the April and May uploads. Clicking on each should take you to the corresponding album on Flickr!
I haven’t produced a gritty urban mono for a while so this is long overdue. Taken with the Samyang 12mm lens (@ f11) which is one of my favourite pieces of kit.
My first attempt at a long exposure wasn’t a resounding success but it provided some very useful food for thought and experience. It also provided a surreal moment as I woke on Sunday morning to find it featured in Flickr’s “Explore” section despite its obvious flaws.
My second attempt therefore was made on a slightly more open stretch of the River Calder although for the initial close-in shot, the trees on the left hand side and part of the front of the scene were still fairly close to the drone. Once again I am using the Freewell 10-stop ND filter.
I have visited this part of Cromwell Bottom a few times recently, shooting the weir from above as an incidental part of a wider scene as well as deploying the infra-red Fuji.
My aim was to keep the shutter speed to around 1 – 2 seconds increasing the ISO if needed in order to do so. In the event it was a bright sunny morning so I was able to keep the ISO at 100 and still shoot with the desired shutter speeds.
weir at Cromwell Bottom, River Calder 10-stop Freewell ND filter
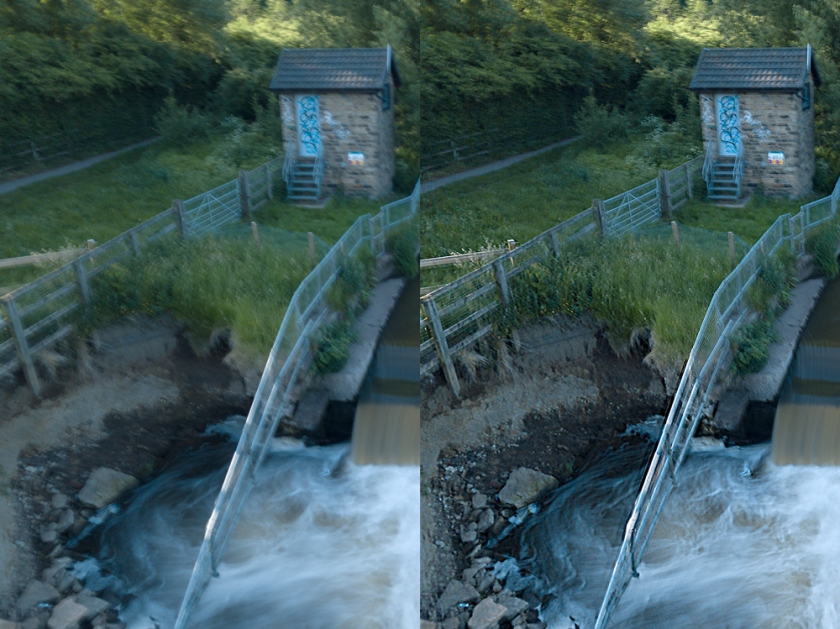
I was using the iPad with the drone for the first time and the larger screen was a boon in quickly identifying that movement was still an issue when the drone was just 14 feet up but as the height increased the stability improved. As I mentioned earlier there are a lot of dense trees to the left of this shot and immediately behind the little monitoring station. I had wondered if these would help shelter the drone perhaps from the slight breeze but on reflection wonder if they were once again swirling the drones own backdraft around? Whatever, once we clear the trees matters improved although that begs the question what would happen in a stronger breeze?
The four images above are straight from the drone and even at this size the motion blur in the first is very evident. I needed to reduce the exposure time for shot three but looking at others I took around 90 feet the thoughts on height affecting motion blur in this situation hold.
Weir at Cromwell Bottom, River Calder
All of the images shot at between 1 and 2 seconds above tree height were very usable, and if the scene had been more photogenic would no doubt have been properly processed too for my Flickr feed and blog. However, this trip was about learning the possibilities and so I wasn’t precious about the actual view. The question remained though, could I salvage the first image, shot from just fourteen feet up? I took the unprocessed image into Photoshop and applied the Shake Reduction filter. I manually selected five areas to provide multiple traces for the software and as you can see above the end result was definitely usable.
Flood damage from a couple of years ago is still very evident
I played with a few exposures between 3 and 6 seconds but wasn’t happy with the results of these on the day. It could be that such lengthy exposures are possible on very still days but that will need some further tests. For now an exposure time of between 1 and 2 seconds seems to give me a nice creative look to the image without too many problems vis-a-vis image quality. As with the first attempt I am very pleased with the neutrality of this ND filter too.
Shot of the Day: weir at Cromwell Bottom, River Calder 10-stop Freewell ND filter
So, a successful morning, a few more lessons learnt and some more food for thought. I’m looking forward to shooting some 1 and 2 second shots above the Northumberland shoreline in the Autumn!
The first anniversary of my Mavic Pro drone purchase passed recently and I got to thinking about what I’d learnt. In truth much of the learning has come in the last few months as I was not well enough to take the drone out over the winter months and prior to that I was still really nervous about the whole flying a camera thing. But practice is really paying off and even the quality of my images has improved considerably.
I am first and foremost a photographer, so, what does this photographer take from his first year flying?
First and foremost
Get used to flying it, to taking off, landing and generally moving about the sky. If you are a first-time flyer, then forget about photography for a few flights. Yes, it will be hard to do and a little frustrating, but practise flying in all directions, squares, circles, backwards, forwards, side-to-side. Get to instinctively know when pushing right on the stick will move the craft left and when it will move it right – it’s easy to forget especially if things go a little awry. The one time I crashed was exactly due to that confusion. With the drone pointing towards me and drifting to my left towards the trees I instinctively pushed the stick right to take evasive action. Except this was the wrong thing to do as it took the drone to ITS right and directly into the branches I was trying to avoid. I always try to watch the drone too when manoeuvring rather than the screen as I can more quickly spot if its drifting in the wrong direction.
Needless to say I didn’t follow this course of action (to be fair no one suggested it) but in hindsight waiting just a little longer to take photographs would have meant better pictures from the start and a more comfortable flying experience. Do as I say not as I did might be another way of putting it!
90 feet above the weir at Cromwell Bottom on the River Calder with the damage done by the floods a couple of years ago still very evident. A one-second exposure, courtesy of the 10-stop Freewell ND filter.
Exposure is critical
The Mavic Pro has a much smaller sensor than many enthusiast photographers will be used to and therefore has less tolerance to noise. Indeed, whilst the stated ISO range is 100-1600 I rarely move it from 100 and I’ve not seen many bloggers or vloggers suggesting using the higher ISO. These days with live histograms on most cameras it is relatively straightforward to “shoot to the right”. I have the histogram up on the screen at all times and watch it carefully. I aim to keep the graph pushed as far over to the right on the screen without “clipping” into the highlights.
Exposing to the right (ETTR) is a well-used technique and means adjusting the exposure of an image as high as possible at base ISO (without causing unwanted saturation) to collect the maximum amount of light and thus get the optimum performance out of the digital image sensor. It is easier to pull down exposure in post-production than to pull detail out of the shadows. With the small sensor on the Mavic I want to start with as much detail captured right from the start, hence ETTR and RAW (DNG) capture is my go-to approach.
Sometimes exposing to the right means that you still have to leave the shadows as silhouettes!
Nail the composition
Here is one very good reason why you want to learn to fly and position the drone with as much accuracy as possible.
You only have a relatively small file to play with; 3992×2992 pixels (typically giving a 23mb file) compared for example to my Fuji mirrorless camera’s 6000×3376 (48mb) or my Nikon D800E’s 736×4912 (72mb). Having to crop into the file throughs away precious pixels and of course if you then need to enlarge the image for printing you are further degrading the image quality.
Try to get composition spot-on to avoid cropping later. Be patient, rotate the drone and take it higher/lower as needed to really get the framing right. Swiping up on the screen to temporarily remove all the data and information displayed upon it can help and don’t forget to check the corners of the screen too. There is no doubt that in this situation the iPad screen beats my iPhone but thats another blog post.
Do keep this in perspective though, I recently printed an image from the drone at A3 and was blown away by the quality. For small prints on on-screen usage the files can take some cropping but to my mind it makes total sense maximise every pixel available and careful composition at the time is a huge help in this regards.
Exercise restraint
When processing your images (I shoot RAW and process in Adobe Camera Raw) try to avoid pushing the sliders too far – less is definitely more and over zealous use of the sliders will degrade the image very quickly in my experience. Once again, getting the exposure right and nailing the composition also help here. I have found that skies generally need some gentle noise reduction, but again don’t go overboard and if you are able to do so I would suggest just selectively de-noising the sky and not more detailed parts of the image.
9 frame panorama DJI Mavic Pro at 65 feet above the River Calder at Cromwell Bottom.
Height isn’t everything
You don’t have to shoot everything from 400 feet up! Just because you can doesn’t mean you always have to. The image above was shot from 65 feet up for example and the shot above of a sunrise on Newborough Beach was taken from five feet.
75 feet up
Be open to shooting each scene from different angles and differing heights. I will often take the drone to 400 feet and then slowly bring it down tweaking the composition and taking a series of different images as I drop back down to around 80 feet. Other times I will watch the screen as I slowly rise into the air looking for the optimal point at which the composition seems complete. There is no zoom lens on the Mavic so, just like using your feet to “zoom” a prime lens on your stills camera, you need to use the joysticks to “zoom” around the composition with the drone.
Of course, I’m not saying don’t take it up – 390 feet
The image above, taken from 390 feet, was one of half a dozen I took as I brought the drone down from 400 feet to eventually place the two trees centrally at 140 feet (see below) but shot from a point more to the right and with the drone pointing more towards me than when it started..
Blackley Top
Conclusion
I’ve a few other things to mention, including my experiences with filters and the various built-in shooting options but five seems to be the “done” thing for initial “top tips” features so I won’t rock that boat. Te recap my conclusions from this exercise, learn the basics (flying), remember to squeeze as much from the little sensor as you can and exercise restraint when sat at the computer.
It’s ironic, but as I get further and further from my schooldays I get more and more prone to schoolboy errors. Simple things usually. I always leave my phone downstairs on charge when I go to bed as it means I have a fully charged phone when I get up the following morning. So, this morning, up with the lark, dressed, grabbed drone (always ready) and the new iPad and off out to see how well the iPad functions as a drone screen and whether it impedes flying at all.Minor inconvenience to find I’d forgotten to charge phone but that was offset by the fact that I was going to be using the iPad so no harm done.
Looking back towards Elland. My house is just out of shot top right.
Off to my usual test zone near the car, park on the roadside and walk the hundred yards or so. In short oder, drone set up, filter attached, controller turned on and iPad cable installed. New iPad in hand so all ready for the test. Apart from one minor problem – the iPad holder is sitting on the desk at home and there’s no way I can wedge this tablet into the controller.So, fall back on the iPhone – with 40% charge (which, incidentally, would be down to 8% by the time I got home). I had a pleasant twenty minutes or so, I find I’m regularly getting 23 minutes plus with a little juice still left in the batteries, but time was up and I left without seeing how the iPad works in practice.
So, I ended up trying out the iPad/controller combination in my back yard.Six feet off the ground with the sensors constantly complaining I was very near an obstacle (house, shed, trees) wasn’t ideal but it gave me a feel.I will need to fly it properly in the open to see how the larger size and weight affect my flying and manoeuvring. It felt a little clumsy this morning, nowhere near as well balanced as the iPhone and I found it slightly more comfortable to angle the bracket so the edge of the iPad rested on my wrists. I don’t need to see the joysticks and my thumbs still rested happily on top although not quite as true as before, tilting very slightly outwards but I think I will get used to this.
Seven feet above the upper patio – I kept myself out of camera-sight for the 34 frames by walking behind the drone
The considerably larger screen though was a joy. As someone who wears different glasses for distance and reading I find juggling two pairs of specs whilst trying to read thedetail on the iPhone screen and also maintaining visual contact with a drone at four hundred feet an interesting challenge.With the larger screen I could read most of what I needed to see without the reading glasses. At the end of the day the iPad screen provides almost four times the real estate of the iPhone so that was to be expected.
The one piece of data on the controller screen that I have got accustomed to using all the time is the altitude readout and whilst this also appears on the iPad screen I found myself constantly looking for it. I often swipe up on the phone screen to give me an uninterrupted view of the scene without the usual visual clutter, it makes composition more precise, and having the basic data on the controller too was very helpful.
So, it will take some getting used to in terms of weight, balance and learning to work without the controller readout but my initial thoughts on this mornings experiments are positive. I cannot see me using it exclusively, the iPhone is always with me and the DJI experience seems to have been built around its form, whilst the iPad is bulkier and also doesn’t fit in the little bag I carry the drone around in.So, on a stroll along the beach with the wife, where I always carry as little photography gear as I can get away with, I will use the phone. However, if down there on my own, or with another photographer, I will usually have a larger bag anyway and the iPad will slip nicely into the front pocket without really adding to the bulk I’m carrying.
Not my best photography ever but I learnt a lot from this mornings mini test on the footbridge over Woodside Locks.
Part of the reason for venturing out this morning was to scratch an itch and also to test a new filter. It had to be done very early (I was out well before 7am) to ensure I didn’t get in anyones way as this towpath is popular with cyclists, joggers and dog walkers at almost all times of day.
I fully understand the concept of ND filters for the drone, especially in controlling shutter speeds for smooth video, but have been surprised to see advertisements for ten-stop ND filters which can extend exposure times into the seconds even in bright sunshine. As drone photographers we tend to keep our ISO at the lowest possible setting but even at 100 ISO and on an overcast morning in the shade of some trees I was getting eight seconds this morning. I could have pushed the ISO up and reduced the shutter speed but the purpose of today was to learn rather than create an image for the wall.
As you can see from the image above, the drone was no more than seven feet above the bridge over the lock with trees encroaching to within the same distance from above, behind and the right. The morning breeze combined with the downdraft from the drone in such a confined space meant it was struggling to remain perfectly still; indeed I was surprised at how buffeted I was stood below and slightly to the drones right.
A proof of concept shot (Freewell 10-stop ND)
An eight second exposure was probably a lot to ask in these conditions! I knew it would be tight under the trees, I’d even put the drone into Tripod mode to ease it gently in to the space, but had not really appreciated quite how much wind turbulence there would be.
A healthy dose of the shake reduction filter in Photoshop has produced an image that confirms the filter is neutral, and that given the right circumstances it should be more than practical to use slow shutter speeds in daylight to achieve a perfectly acceptable long-exposure from the air. To be fair I could have increased the ISO and thereby increased the shutter speed to 2 or 4 seconds for example, but this was after all just a quick experiment to see whether the new filter lived up to the good reviews I’d read online and to prove that the drone could hold still enough for a longer exposure.
I’m convinced that in a better environment I will be able to capture some interesting and creative images with the drone. I probably need to avoid hovering in what was effectively a wind tunnel next time! Mind you, that won’t stop me trying this again with a shutter speed of 2-4 seconds to see if that helps.
FREEWELL ND1000
The filter I was using this morning is a Freewell FW-MAV-ND1000 Filter. It fits snugly and easily and is also straightforward to remove afterwards yet still feels very secure on the lens. Drone start-up and gimbal calibration was not affected and the files have no appreciable colour cast in the test shots I took this morning returning an image with the same colours compared to shots from the same basic area and height but with no filter attached.


You must be logged in to post a comment.