Well, I teased it a few days ago and today I got back into the darkroom again after an absence of four years or so. I will blog properly soon but in the meantime the first print just before taking it out of the fixing baths and transferring into fresh water prior to washing.
I recently acquired three “new” lenses, all M42 screw-thread, and all what are generally classed as “vintage” by amateur photographers. One, the Helios 44-2 58mm f2 is a bit of a cult classic and it’s odd to have one in my hands again after so many years. This is probably my fourth 44-2 as these lenses were the “kit” lenses of the day that usually came with the Zenith SLR bodies of which I’ve owned three in the past starting in the mid-1970’s. It’s ironic that a lens that I’ve always considered a little bit soft and couldn’t wait to upgrade from has become almost a talisman for the creative photographer in 2019.
So, the three lenses I purchased this week are:
Pentacon 50mm f1.8
Helios 44-2 58mm f2
Helios 44M-4 58mm f2
I chose to partner these lenses with my Fujifilm XH-1 using a cheap, generic adapter to mount the lenses. This is basically just a black metal tube with a female 42mm thread at one end and a Fuji-X mount at the other. It doesn’t allow for the lens to be focused at infinity but that was not an issue for the test I had in mind. I’ve bought these lenses for one reason, to see what bokeh effects I can get when photographing flowers and such-like in the garden. I’ve shot so many for my 365 Challenge over the last two years that I’m looking for something a little different.
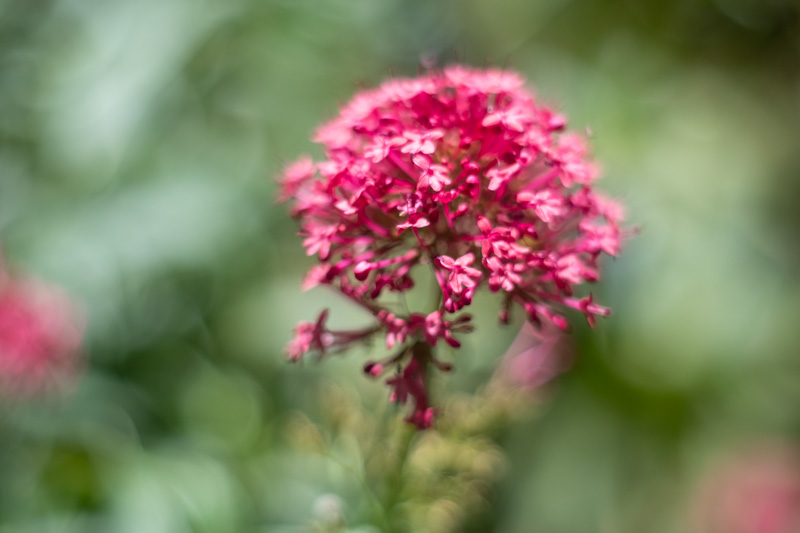
Playing with a vintage Russian lens, Helios 44-2 58mm f2 wide-open on the Fujifilm X-H1. Final image processed on iPhone using Snapseed
Conditions were not ideal for flower photography, it was rather windy in the front yard but I was keen to see what potential these lenses had and wanted to play before the “perfect” conditions arrived so I knew which to grab first when/if such conditions arose.
The first thing I did was shoot all three lenses wide-open at their maximum apertures. The results are above. Remember I’m not looking for sharpness per-se but the overall effect and in particular the background bokeh. The ISO was set at 400 throughout the test and I let the XH-1 determine the shutter speed. The day was overcast with occasional, brief bursts of sun peeking through and for these first three shots the shutter speed ranged from 1/4400th sec to 1/7500th sec. I focused on the centre of the flower head as far as possible.
Which you prefer is a matter of personal taste and your desired aesthetic. At this stage I preferred the Pentacon and Helios 44-2, but there is not a lot in it.
The next thing was to stop the lenses down a little to determine what effect that had. The 44M-4 has an automatic stop-down controlled by a small plate in the camera body which moves forward when the shutter release is depressed to push in a pin on the lens mount which closes the aperture blades to the chosen aperture. Unlike the other two lenses this lens does not have a means of manually stopping down and as I didn’t want to mess around with gaffer tape I decided to omit it from the stopped down tests.
As with all the images here each set of images was processed EXACTLY the same
The f8 test shows a definite difference in the out of focus background and at this aperture, on this subject, the Helios 44-2 better suits my taste. Your mileage may vary of course!
Pentacon 50mm f1.8 @ f8
Helios 44-2 58mm f2 @ f8
I’ve included a few more images below but by way of a conclusion, for my taste and for what I want to achieve the Helios 44-2 58mm f2 will do a fabulous job I feel. It is sharp enough, not bitingly sharp, but sharp enough. The out of focus background at F2, f4 and f8, the only apertures I tested, are the most consistently pleasing and of course I can manually stop the lens down.
To finish, lens flare at f2. The leaf blew away slightly exposing the naked sun, I could not resist the resultant full-on, all-over, flare-fest. One for my textures collection!
Something different for this take on Mr C’s 9/45 Challenge. Colour and a walk that apart from the first few hundred metres covers an area of Halifax that I’ve not been to before nor indeed passed through as it is an area of back streets beyond the town centre itself. I walked in a meandering loop ending up not too far from where I started.
A fairly standard shot for me and an easy first shot in many ways
Starting at Bull Green at around ten past eleven, my first shot was taken as I turned into Gibbet Street and the second at the other end of the same street. The first makes use of the colour contrasts and a bright blue sky. It’s a safe composition but a good start and set me up for the rest of the Challenge, which was indeed more challenging than I’d expected. I’d normally not take a photo walk so late in the morning, especially with a bright harsh sun in a blue, virtually cloudless, sky and this coupled with the environment I was walking in made for an interesting walk. The second image is a historically interesting image, so lets precede it with some history.
The Halifax Gibbet was an early guillotine , estimated to have been installed during the 16th century, it was used as an alternative to beheading by axe or sword. Halifax was once part of the Manor of Wakefield, where ancient custom and law gave the Lord of the Manor the authority to execute summarily by decapitation any thief caught with stolen goods to the value of 13½d or more, or who confessed to having stolen goods of at least that value. Decapitation was a fairly common method of execution in England, but Halifax was unusual in two respects: it employed a guillotine-like machine that appears to have been unique in the country, and it continued to decapitate petty criminals until the mid-17th century.
I was a minute or two late taking the image as I got distracted by the information board
The device consisted of an axe head fitted to the base of a heavy wooden block that ran in grooves between two 15-foot (4.6 m) tall uprights, mounted on a stone base about 4 feet (1.2 m) high. A rope attached to the block ran over a pulley, allowing it to be raised, after which the rope was secured by attaching it to a pin in the base. The block carrying the axe was then released either by withdrawing the pin or by cutting the rope once the prisoner was in place. Incidentally, the axe head fitted to the gibbet is a replica – the original is in a museum.
Greenmount Retail Park
From Gibbet Street I turned down Bedford Street North, ending up on one of the main roads into the town centre and the third image was taken on the corner of Pellon Lane and Hanson Lane by the retail park.
I can rarely resist a chance to shoot into the sun
I then proceeded along Hanson Lane and from here I wandered, taking turns at random and initially when I sat at the computer I could not be sure where these next few images were taken but Google Maps/Street View has helped me reconstruct the route and I’m now pretty confident on where I took the remaining images. The one above was taken along Hanson Lane looking over the fence into the Hanson Lane Memorial Garden.
Francis Street
A few twists and turns led me to Francis Street, a long, mainly residential street with cars parked pretty much everywhere. I stopped when the phone bade me do so and if I wanted to avoid cars then there was only one direction in which to point the Fuji.
I had just turned into Parkinson Lane when the timer sounded again. This was at the farthest end of the Calderdale College campus and I was grateful that the timer hadn’t gone off before I had turned the corner as the street was full of students and tutors on their lunch breaks. I was therefore particularly pleased with the simple composition I found to my left.
I so wanted to crop this square but was sticking to the rules!
Continuing down the lane I turned left onto one of the main roads back towards the town centre. I quickly took another left though, into Park Road, to get me off the busy, and noisy, dual carriageway. This was a broad, tree-lined street which hinted at the prosperity this part of Halifax once enjoyed. These old villas were largely multiple occupation now or undergoing repairs and the whole area was consequently a little shabby around the edges.
Yes – my thumbs itched to correct the converging verticals
The bright blue sky contrasted well with the stonework of these magnificent old villas. At the end of the road is the entrance to the park which runs along most of the length of the road and from which the road clearly takes its name. I couldn’t resist a peak inside and so my eighth image is taken in the peaceful surroundings of The People’s Park.
Stepping back onto Park Road I then turned right down Hopwood Lane towards my final destination which turned out to be the Elsie Whiteley Innovation Centre, home to a thriving community of creative, digital and innovative businesses, according to their website. For me it was the final shot of the set and another chance to play with shadows and contrasts. I used pretty much all of my allotted minute waiting for someone to walk into frame and whilst I’d hoped for someone approaching along the sunlit strip this was the best I saw before my minute was up and so “snap” the Challenge was completed.
Walks end … and another ten minutes saw me back where I’d started!
These 9 in 45 walks are challenging me in a way that I was not expecting. I’m forced to resist the temptation to take images which is counter-intuitive. I usually walk the streets looking for images and taking whatever opportunities arise. This challenge focus me to keep my camera in my bag until the appointed moment and I find that hard. Yesterday I was tempted to walk back to one location once I’d completed the Challenge to take an image that had caught my eye earlier in the walk, however a raging thirst and a desire to sit down with a coffee took precedent. Instead I shall go back next week at some point.
The mix of horizontal and vertical images shows I’m not afraid to turn the camera on its side too!
Next week (Week 4 of FF) sees the first upload of recent film work. As a sneak peek this image was shot on 6th September using one of the toy cameras in my collection.
Taken with a Holga Panoramic 120 film camera loaded with out of date (6/10) Ilford HP5. Taken on 6th September for my 365 but not uploaded to my Flickr account until the 19th as I needed to get the film developed and then needed to scan the negative.
Scan of a print I made in the darkroom. This would’ve been taken around 1981/82. Definitely 35mm, probably a Canon AE1 or possibly th Praktica EE2. What isn’t in doubt is that this was shot on Ilford HP5 B&W negative film.
I had hoped to be able to share a recent film image but it seems that sending films off takes a lot longer than I’d anticipated. To remedy that I’ve just ordered the requisite chemicals and am cleaning off the developing kit ready to start processing my own again.
I love contrasts and I love textures. This image has both and it wasn’t a question of should I make the photograph but rather how many windows to include in the composition.
That exposure is important is a self-evident truth that doesn’t need expanding upon here. Imagine my disappointment then when two precious rolls of Velvia 50 came back from the lab with muddy shadows, muted colours and on one roll evidence of winding on problems with the film holder.
That was 2015 – and so disappointed was I that I threw the two sleeves in a drawer to lay undiscovered … until today.
The offending film back is history needless to say. After first checking that it could not economically be repaired I placed it on a shelf until many months later when I felt ruthless enough to get rid of it. I did however decide to scan a few of the images today and reflect upon the disappointment publicly for the first time – luckily I only have one reader!
The picture of Sligachan Bridge at the top of the page was one out of a tiny number of images from 24 negatives that did not disappoint and I clearly got the exposure just right by luck or judgement. To be fair it was a tough day for metering such an uncompromising material as slide film as it was generally dismal, grey and prone to raining. The very occasional ray of light filtered briefly through but on the whole it was naff – I vividly remember struggling to adjust the camera settings with one hand whilst holding an umbrella with the other.
Sligachan FAIL!
To try to deal with the differences in tonal range between sky and foreground I decided to use my Lee filters. I also chose to fit the holder with the attached polariser figuring this would help me control the glare from the water. I made so many mistakes you’d think I was a complete rookie. The reflection of the filter holder can be seen in the image above around the edge and a bright circular area in the middle shows it is the filter holder and polarising filter we are seeing. Honestly, if it wasn’t for the fact that I’m wanting to record my learning this image wouldn’t see the inside of my hard drive let alone public gaze.
Hasselblad in the rain on Skye in 2015
But, it was not all doom and gloom, especially as I am able to sit here today and reflect upon the myriad small things that went wrong, the Sod’s Law of a defective film back and of course a couple of pleasing images. In hindsight it was a crap day weather-wise and I should’ve stuck to the Nikon DSLR in my other bag!
Photoshop has rescued this one to some degree but not totally
The image below was a direct result of the faulty film back. It was a newly purchased second back and I was using it for the first time. I had one roll of the 120 Velvia 50 in this back and the other in the original film back I’d been using ever since I’d purchased the Hasselblad. Whereas most of the other frames on that roll have a small degree of overlap this is a complete double-exposure. But its not all bad news as it was in fact this frame that alerted me to the exposure errors I’d been making all morning as, unlike the other frames which are generally too dark, this had a reasonable exposure level despite being exposed twice. I’d forgotten the old film adage “expose for the shadows and develop for the highlights” it seems.
An interesting, if unintended, double-exposure
I couldn’t do much about the faulty film back, that was pure bad luck and I stopped using it the minute I realised it was slipping. Sadly, as I only have 120 roll film developed when I have half a dozen or so exposed rolls, I’d put three or four more rolls through the back before I found out it was defective.
So, there we have it. My dirty washing publicly aired as it were. I hope the lessons I learnt will be useful for others:
This is film – expose for the shadows,
Shield filters to prevent glare or reflections especially when they stand proud of the lens,
Check the filter holder is large enough not to encroach into edge of frame,
When using a Lee 105mm polarising filter in the standard holder ensure it isn’t reflecting off the front element of the lens (the front element of the lens I was using is fairly deeply recessed in the lens barrel),
Meter once, meter twice and meter once again,
Check “new” gear before entrusting lots of film to it,
One of the things I noted whilst researching instant film photography and in particular Polaroid cameras was the market for out of date film. Packs of long-expired film were changing hands on eBay for more than a fresh pack would cost on amazon for example. The potential for weird and wacky colours and effects, together with the unpredictability of the expired film seemed to be the draw.
I was delighted therefore when a pack of expired Polaroid 600 colour film arrived in the box with a newly purchased Polaroid Sun 600 camera. A chance to try expired film without any additional cost! I was excited by the possibilities. The film was however “use before 2002” which given the stated life of 12 months, the passage of 17 years and the knowledge that colour film generally deteriorates faster than black and white left me feeling very doubtful as to its veracity. I was not disappointed.
The 1st image on the middle roll has a hint of the subject in the very middle
Those are not Newton Rings on the border incidentally, I photographed these 9 (of 10) prints using my phone. The tenth was exactly the same and is only excluded so I could make a nice square.
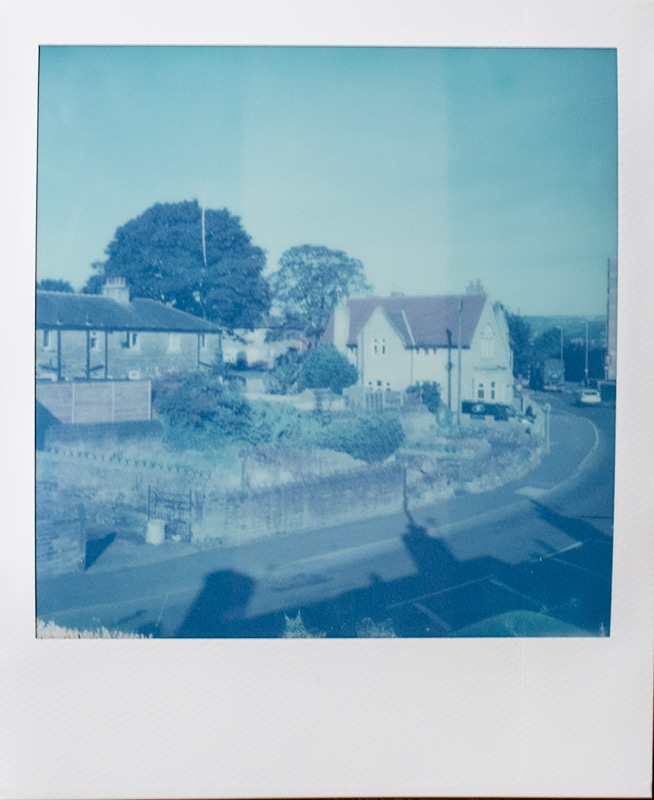
So, my first foray into the world of out of date film was interesting even if it was not particularly productive. How would a pack of Impossible Colour film, expiry date 12/16, fare in the same Polaroid Sun 600 camera? At a mere three years past its expiration date surely some magic was on the cards?
Remember this is COLOUR film!
I shot the image above on a crisp but bright and sunny day in good light with a fabulously blue sky. On a glossy colour film.
As you can see I do have an image this time, in fact all eight prints produced a recognisable image. But where was the colour! The batteries were clearly failing too as I struggled to get the last two shots exposed and ejected but they hung on grimly to the end. Just.
This scene is normally a “banker” for vibrant colour …
I have not desaturated these images at all, in fact I’ve photographed them with a Fuji X100t, in good, even daylight and I’ve carefully matched the images on the screen to the prints on my desk. I don’t dislike these however although I’m not rushing on to eBay for another pack of expired Impossible film!
A sealed pack of Polaroid 600 Extreme, expiry date 12/2001, was the next film to come into my possession. Tucked in the bottom of the box where no doubt it had sat since the camera was bought. The box advertised “Plus 2 Free Films!” and no doubt only the first got used. I put this through a Polaroid Supercolor 635 camera, a reliable old camera that’s produced some nice images. As with the Impossible film the batteries were clearly failing and in fact after just six of the ten prints were exposed they gave up the ghost entirely. But was that a problem? See for yourself below!
At least the box retained it’s saturated colours!
So, that is my experience with three expired instant films. Be warned I do have a couple of packs of Polaroid 300 Instant film, expiry date June 2012, which I shall soon put through the Fuji Instax Mini 90.


You must be logged in to post a comment.