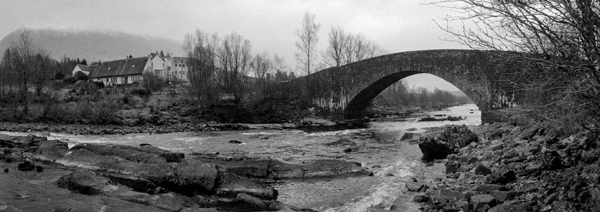
The final day of any trip involves the wearisome task of driving home. Generally it would be me sat behind the wheel but one of the luxuries of mine and Dave’s joint travels is that Dave usually drives. We are conscious of wanting to squeeze a few more photos out of the week but equally conscious that we also need to get back so on the return leg we adopt the approach of driving unless or until we see something worthy of a roadside photo. We don’t go “off-piste” and explore side tracks, nor do we generally head towards one final destination. We always end up making at least one stop!
First though, breakfast at the Green Welly in Tyndrum.
I was pleased to be sat in the passenger seat – iPhone 13 Pro
As it was there were no temptations on the drive back home this time. The weather finally turned against us and we were only too happy to plod on down wet and murky roads stopping just once for a coffee until we reached the comfort of my front room and a mug of proper Yorkshire tea.
The photographic fates had one last sting in the tail for me however. I had taken the Fuji X100T with me for a quick stroll before departing the cottage and made a few images so that I would have something for my ongoing 366 challenge should we not make a photo stop driving back. I was mightily glad that I had in the circumstances as the three pictures I took were the only ones of the day. However, I had not noticed at the time that I’d left the camera on ISO 200 so everything was shot at 1/4 of a second … not my sharpest ever images!
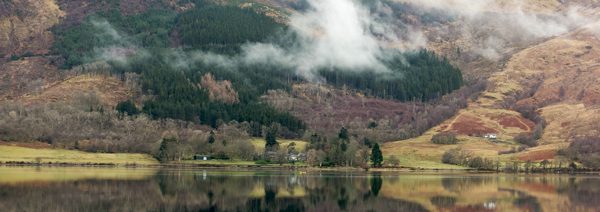
One last look at Loch Leven – Fuji X100T
“Home” for the week – Fuji X100T
Whilst the final day might have been a bit of a damp squib photographically it couldn’t take the shine off a thoroughly enjoyable and creatively productive week. There’s no getting away from the issues I had with the 6×17 film holder but the lessons learnt along the way will contribute to many far more successful outings I’m sure. The various drone flights produced some very satisfying images and I had the pleasure of watching Dave grow more confident with flying his drone as the week progressed. The Fuji X-T3 performed flawlessly throughout the week and the new magnetic filter system that I bought for the trip proved to be a joy to use (I might, just might, write about it one day).
The Corpach Shipwreck – iPhone 13 Pro
I will probably produce one final blog post from this trip comprising of images that didn’t make the daily diary posts, however given the snail-like pace of my digital post-processing I’d not hold your breath on that! In the meantime here’s a few from the trip that haven’t yet made it into my blog.
Our last full day before setting off for home tomorrow. Neither of us fancied a long drive so we decided to stay local and head back into Glencoe. Driving over the bridge into South Ballachulish however we made a sudden change of plan – based on the look of Loch Leven as we passed. For the first time this week the surface of the loch was still … the wind that had been with us since Friday (when it “burnt” my lips) had abated overnight and all was still.
Pre-breakfast there was a stiff breeze running up the loch. Fuji X100T
What a difference an hour made. Fuji XT3
These were the first proper reflections we’d seen all week and the first time we’d not been subjected to strong winds. Glencoe would need to wait as we decided a trip around Loch Leven was called for.
We’d already driven around the loch at the start of the week so decided to limit our stops to a few chosen locations; we didn’t want to run out of time again like yesterday!
As well as the wind picking up the light was subtly changing around us too. Fuji XT3
The breeze soon picked up again sadly, but at least it meant we weren’t diverted too long from our original plan.
Just looking at these first six images, all made with a digital camera I couldn’t help but notice that five of them have been cropped in post production to a panoramic format whilst the other has been cropped to a square or 1:1 format. It doesn’t come as a surprise to me, only yesterday someone asked me my favourite format to which I replied 6×17 and 1×1, but it was interesting to see it so visibly demonstrated here. But I digress.
Composed in-camera for the square crop. Fuji X-H1
I realise I’ve not made reference during this series to the gear I used during the week. So, excluding my phone, here goes with a little list:
Fuji X-T3 (18-55 and 16mm lenses)
Fuji X100T
Fuji X-H1 (50-140 lens)
DJI Mini 3 Pro drone
Intrepid 4×5 field camera (large format film)
Chroma 617 roll film back (medium format film)
Horizon S3 Pro (35mm film camera)
The first four are digital and the final three are all film cameras. We’ve seen images from all but one of these cameras so far in this series of blog posts. The “missing” one is the Horizon which I took along to test as I’d not used it for a while so I only put one roll of film through just in case. I am pleased to say it passed with flying colours so its back on my regular roster now.
The X100T was my early morning companion for this trip as indeed it has been every day this year as I usually make my 366 image with this camera. The Fuji X-T3 was the workhorse whilst the X-H1 had the 70-200 (equivalent) permanently mounted. The drone as you’ve already seen got a fair amount of use over the week. I’ve discussed the Intrepid/Chroma combination in an earlier post – suffice to say when it went well it was stunning and at least I now know what went wrong.
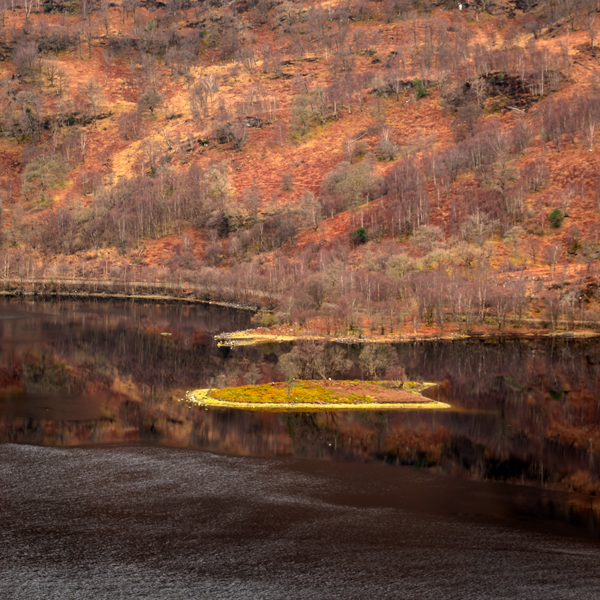
The Pap of Glencoe mountain peak in the distance as we fly above above Seagull island on Loch Leven. DJI Mini 3 Pro (9-frame panorama)
Fuji X-H1
Having enjoyed capturing Loch Leven in different conditions to our earlier visit we were keen to get back to our original objective – Glencoe. Whilst a brew would’ve gone down well at that point we promised ourselves that we’d boil the kettle once we got to the Clachaig Falls in Glencoe. I had saved two frames on the 617 film back for this return visit (we know now what I did not at the time – it would be a waste of time) and I also had an idea to fly the drone out over the river where I would never dare to set foot nor tripod myself.
Clachaig Falls is a lovely small waterfall on the lower reaches of the River Coe just outside Glencoe. DJI Mini 3 Pro
After another (admittedly lovely) mug of tea brewed from teabags of uncertain origin (I was missing my Yorkshire tea by now) we carried on into Glencoe. On a whim Dave pulled on to a piece of rough ground and we then walked down to the river to explore the potential from that spot. What we found was a delightful little scene and we decided on another whim to make this our lunch spot. As the non-driver it was (rightly) my task to hike back up to the van to collect the victuals – and a spare battery because someone (not me) ran out of juice at just that inopportune moment. Basic ham sandwiches never tasted better than sat on the river bank taking in the stunning scenery and reflecting on how good it was to be sat there.
What a place to sit and eat a picnic. Fuji X-T3
After lunch we headed back to the car and drove on further down the glen until we reached the turning for Glen Etive. We had pretty much lost the best of light by now but with plenty of images on the memory cards we were not unhappy, far from it, this had been a fabulous trip. However, we did make a few more images before we got back to the cottage, including a quick stop at the iconic Buachaille Etive Mòr.
Stob Dearg is the highest and finest peak of Buachaille Etive Mòr, and one of the most famous sights of the Highlands. The mountain presents a remarkable pyramid of rock to travellers along the A82 across Rannoch Moor. The first time I photographed the mountain a friend remarked that he didn’t like the image as the mountain was too triangular! Go figure.
Unfortunately the terrain leading up to the mountain and the river that curves protectively in front of it has been ruined by the sheer volume of visitors and it has to be said the total disregard of some to preserving the beauty of this location. Don’t get me wrong, some visitors will respect and protect but sadly the evidence here suggests that not everyone does. We chose not to add to this tragedy but instead, despite it getting quite dim by now, we flew the drones for the final time this week and captured a few images without further destroying the surrounding landscape.
Stob Dearg – a tragic despoiling by people who claim to love the outdoors. DJI Mini 3 Pro
Finally – a self-portrait. DJI Mini 3 Pro
So, the final full day of the trip ended with a very pleasing image of a not so pleasing sight. We headed back to the cottage talking of plans for 2025 but before then we had to pack and tidy up before setting off for home in the morning.
Would the Friday provide some lovely opportunities to add to our creative endeavours as the previous Friday had on the outward journey? There’s only one way to find out!
Weather-wise Tuesday was a bit bleurgh. Whilst we didn’t get a soaking at any time nor did we get those lovely rays of sunlight beloved of landscape photographers. Dull, damp and dreary would be my alliterative summation. However, that didn’t stop us capturing plenty of images and it was a day when the two drones saw plenty of flight-time.
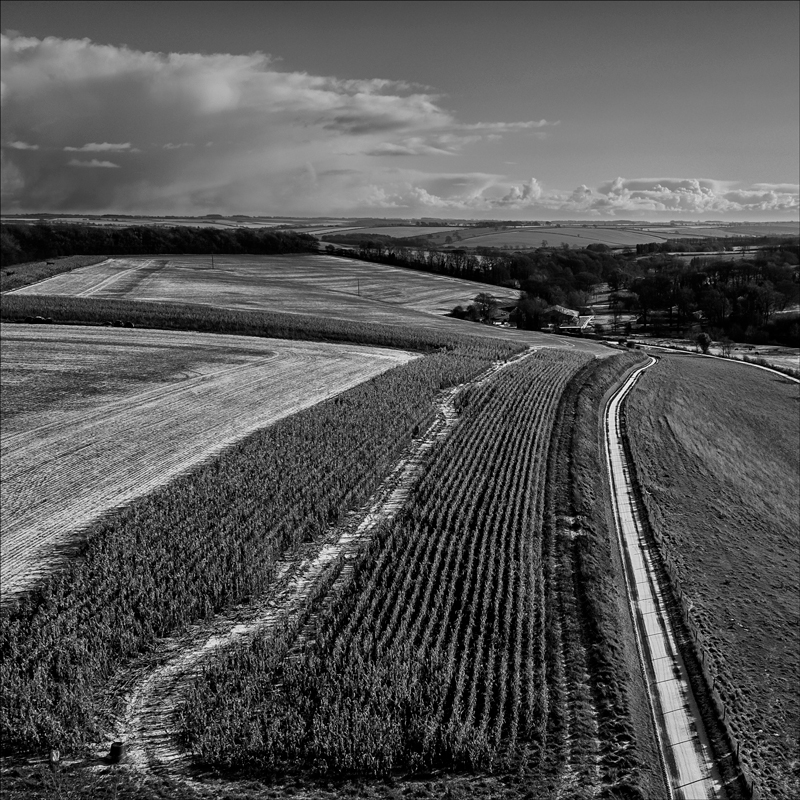
The long and winding road
Given the conditions we were happy to simply potter along in the van, stopping occasionally to pop the drones up into the air to see what potential the landscape offered. Looking at the memory cards later it was clear that we’d made good use of what light there was and we both returned that evening to our holiday cottage content and satisfied that we’d made the best of things.
Looking at the files on my hard drive it was a day when most of the photographs we made were from above the landscape. I did put a roll of Ilford FP4+ through the 617 film back (see previous post) but none of that roll were salvageable which was a shame as I spent some time on the compositions and my notes show I brought the orange, polarising and neutral density filters into play.
Loch Etive: Fuji X-T3 60 secs CPL and ND64
As we waited for the kettle to boil I took the Fuji X-T3 down to the loch side and made a few exposures that were compositionally similar to my ill-fated film images. Different ratios but the same principles using a circular polariser to remove glare and a six-stop neutral density filter to soften the rather choppy waters of the loch.
Glen Etive: Fuji X-T3 0.3 secs CPL
As we sat with the final brew of the day we chatted about the days photography. From very unpromising beginnings we’d both captured a fair few images we were happy with. Making the best of what you’ve got in front of you is a no-brainer on days such as this. If we’d gone with a rigid plan that relied on the right conditions at each location we would I suspect have been very disappointed. By working with what we had though we both made some pleasing images.
Continuing the series of posts following my day and a half in the Lincolnshire Wolds it’s the turn of the diminutive drone today. I’ve posted on my blog many times in the past with updates on my drone adventures … and misadventures. It’s no secret that despite being a very enthusiastic film photographer I have loved playing with the drone over the last few years. A one stage I had four in my fleet but these days I just use the one, a lightweight DJI Mini 3 Pro which is plenty of drone for my modest needs.
Usually when I take the drone out it’s the only camera I have with me and typically it’s pre-sunrise when I go out. It’s very rare therefore for me to travel with cameras and drone but as this was as much a recce as a “shoot” I had a variety of cameras with me as I mentioned in part one. The drone was a “just-in-case” addition to my bag and in the event I was very glad to have it with me.
In-flight panorama
It will come as no surprise to my regular reader that my favourite mode when using the drone is the panoramic function. There are various options and I enjoy playing with them all. Usually I would have the file type on the drone set to RAW and would therefore create the stitched panoramas at home on the computer. Prior to this trip I’d updated the firmware and fly safe database on the drone but, crucially, I had forgotten that many settings get reset in the process including the one to capture my panoramic files as RAW. Not a major problem as the drone will stitch panoramas whist in flight and produce a JPEG however it limits my post-processing options and occasionally the drone produces a suboptimal result. Plus of course I like to be in full control of all aspects of the process. C’est la vie, I still have some pleasing results and have learned another small lesson.
It’s a small world – stitched in-flight (see above)
Although the controller screen gives a good view of what the drone’s camera is capturing I don’t feel it is sensible to be chimping whilst concentrating on safely flying the drone. I use manual exposure controls and an on-screen histogram to keep me on the right path exposure-wise but also use the drone’s automatic exposure bracketing (AEB) function for all non-panoramic images. Capturing five RAW images using AEB in this way gives me maximum options later when finishing the images on the iPad or computer.
Thursday’s one short flight produced a nice image … fifteen minutes after landing and packing away the drone the sky kicked off very nicely … but we were back on the road
Despite holding the necessary qualifications to use the bigger drones with almost as much freedom as my lighter drones I chose to only keep the Mini 3 Pro when it came to rationalising the number I owned. I’d originally considered selling two and keeping two which is what I did at first. However, over the following six months, during which I used a drone regularly, I found that I was using the small sub-250g model most of the time. Its small size means that the drone, four batteries and the controller all fit in a tiny bag. It can also be deployed very quickly at need, very useful when the light is changing rapidly. As a photographer I need kit that doesn’t get in the way of creating the image and the Mini 3 Pro excels in this department.
One image – two treatments. Which do you prefer?
As I mentioned earlier, usually when I take the drone out it’s the only camera I have with me so to pack it in my bag with an interchangeable lens digital camera, a 6×17 panoramic film camera and a digital infrared camera was a big departure from my norm. Whilst it probably won’t become the norm to pack such a diverse kitbag for a day out I certainly wouldn’t be concerned about packing the drone if I thought it would be useful. I’ve proven to myself that I can work with both digital and film on a day out or with pinhole and panoramas simultaneously so adding a drone into the mix should be perfectly achievable.
The rain to the right soon reached us!
The Wolds proved to be an interesting location for drone photography
You don’t always need to be 400 feet up!
I shall finish with my favourite drone image of the trip (above). I chose this because it illustrates one of the key things I have learnt during my time photographing the landscape with a drone. Just because the drone can, legally, fly at four hundred feet above the ground it doesn’t mean you always have to fly at that altitude. The drone was around twenty to thirty feet above me when I made this image. I often find that just being able to gain a little extra height above the tripod makes for some interesting images.
I hope that you’ve found an image or two to like here, let me know which is your favourite.
Whilst often prone to impulse buys, I’m not usually an early adopter of technology, indeed the only example I could come up with in my entire adult life was the Canon 5D MkIII DSLR camera back in early 2012. Ten years later though I’ve repeated the phenomenon.
It’s only a few months since I upgraded my Mavic Pro camera drone with the DJI Air 2s and also added a lightweight Mini 2 drone to the mix. Two drones that nicely complement each other and if we are honest, together they meet all of my aerial photography needs admirably. So, why have I just taken delivery of the latest small drone, the Mini 3 Pro, from DJI?
Well partly the influence of other people on the drone fora I frequent to be sure. Partly fear of missing out. Partly because by chance I happened to have funds available at this time. But mainly because I need* it.
So, what do I think of it?
Fabulous in a word.
Seriously, I was very impressed with the way it handled straight out of the box. I couldn’t get out for a full flight yesterday but wanted to try it so I took it into my front yard (very tiny) and placed it in the middle of the yard which is only two to three feet from the wall of the house). It acquired the requisite number of satellites very quickly to enable me to take off and I was very impressed with how smoothly it responded to the sticks as it rose up through the gap twixt house and trees. It was rock solid and didn’t drift at all, a major consideration in such a tight space.
Flying is not my hobby, I‘m a photographer who also uses drones, so the most important factor will ultimately be image quality and that too looks promising. As anyone who’s followed my blog for a while will know I am predominantly a film photographer and I’m used to working with black and white film. Many of my drone images end up in mono too, so the response of the Mini 3 files to image manipulation will be important. I’ve yet to test the image making potential but will do soon I hope.
Unlike my other/past drones the Mini 3 Pro doesn’t rely on my phone for a screen but has one built into the remote controller. If I’m totally honest, whilst very excited by this option I did not find the Mini 3 controller with screen as comfortable to use as the one I usually use but that’s going to become easier with practice I’m certain; and to be fair I’ve only used it the once.
Forecast for next few days is strong, gusty winds and rain so it may be I can’t fly it properly until the end of the week or even early next week but first impressions are very positive. I will keep you updated!
In the meantime, I nipped back into my front yard just before bedtime to capture the sunset.
Images: DJI Mini 3 Pro
*need in this context means “want” if I’m really honest.
Yes, you read that right … I’ve just checked our gutters on instructions from my wife. This time however I didn’t borrow my son-in-laws ladders but did it the smart way – with a drone. My little Mini 2 to be precise. Whilst aloft it would have felt a little rude to ignore the opportunity for a few unique views of the street.
Checking the gutters at the back of the house (honest)
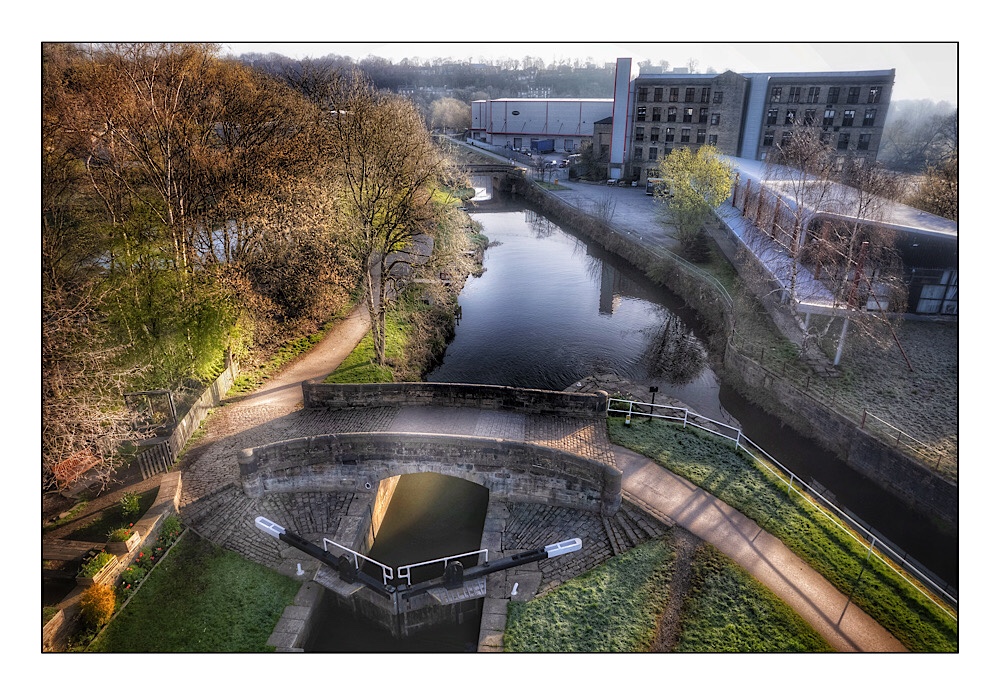
Two identical images … one in the original colour and the other in fabulous mono! The replacement drone got a second flight on Sunday morning. A frosty morning with the sun just starting to peak into the scene.
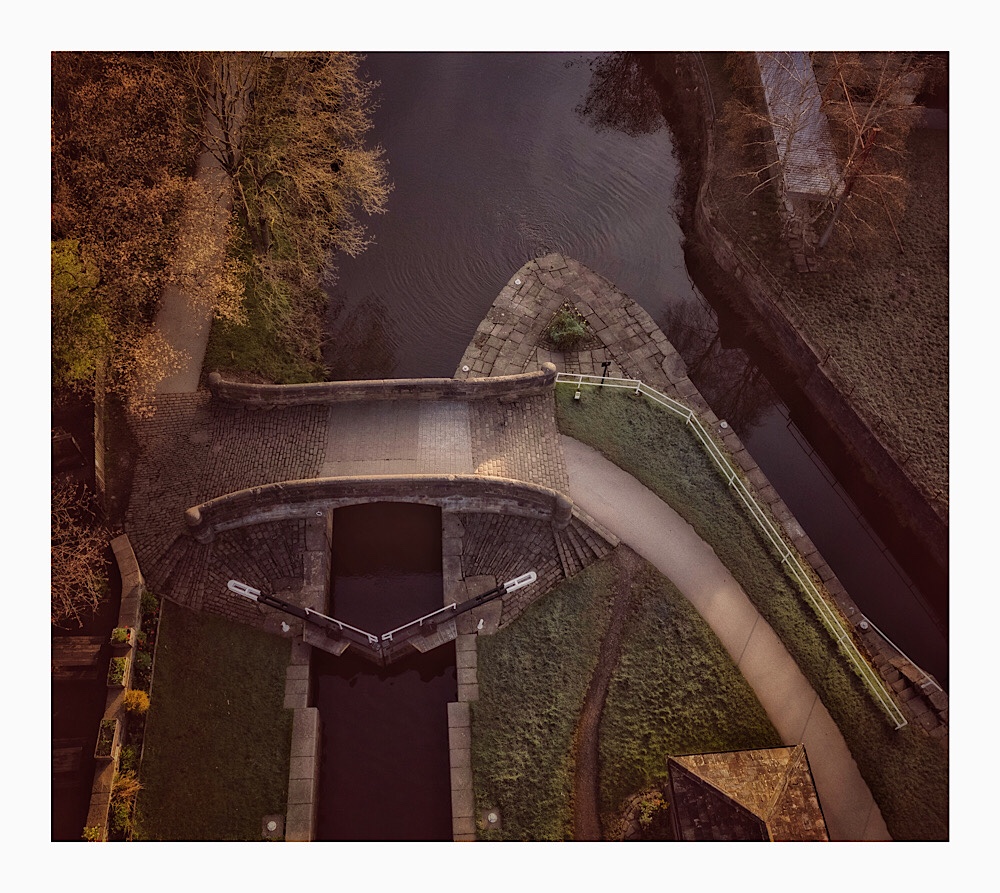
A more abstract view of Brookfoot Lock
So, which do you prefer?
DJI Air 2s, captured as RAW and processed in Lightroom.
Two identical images … one in the original colour and the other in fabulous mono! The replacement drone got a second flight on Sunday morning. A frosty morning with the sun just starting to peak into the scene. I will pop a small gallery of images on as another post.
Brookfoot Lock
The sun is rising in the top right of the image hence the warmer tones on the left of the image and the cool blues in the shadows on the right.
One of my guilty pleasures over the last five years has been drone photography. On a recent trip to Eyemouth I was able to fly the drone on each of the four mornings we were there. On the final morning we finally got the conditions I’d hoped for so I headed to the beach before 6am for sunrise at 6:20am.
The pre-visualised image from the final flight of my Mavic Pro
Long story short, I got my previsualised image but as the drone was returning from its short flight it was ambushed by a small number of rather large gulls. It was over very quickly and there was only ever going to be one outcome. Gulls 1, Drone 0. Ironically, I’d seen videos of such occurrences and had cut my flight short due to the increased gull activity since I’d launched my Mavic.
Scouting party?
It ended up on a ledge about twenty feet above sea level. Scrambling over the beach I got to a point about twelve feet below this precarious perch and by some miracle I managed to scramble up and retrieve it, tucking it into my coat in order to have hands free to get back down again. It was pure adrenalin that propelled this sexagenarian with dodgy knees up that cliff face (although any youngsters reading could’ve done it in a flash I’m sure). Back at sea level and still surprised at my rashness I inspected the drone but the dangling motor arm told me all I needed to know. I’d not be flying at Whitehaven the next morning.
My favourite image from that last morning
After three weeks of long and tense negotiations I reached agreement with Senior Management and the Financial Controller and ordered a replacement. Not a like-for-like replacement however. My aged DJI Mavic Pro was to be replaced with a DJI Air 2s, a big improvement especially in terms of the camera and sensor.
On a windy morning with drizzly rain coming and going I set out for my maiden flight with the new drone. Nowhere exotic however, back to the flood plain where my Mavic Pro had its maiden flight almost five years ago.
Maiden flight at the flood plain
So, here are a selection of snaps from that maiden flight. The new drone handles nicely and the updated app used to fly the drone seems reasonably intuitive. I’m pleased with the image quality achieved from this first outing and looking forward to seeing what I can achieve with it in the future.


You must be logged in to post a comment.